This documentation is adapted to FastNesting version 1.1.2.
Getting Started with FastNesting
FastNesting is a powerful optimization plugin for Rhinoceros 3D that helps furniture manufacturers and CNC workshops nest pieces efficiently, from 3D model to cut list instantly.
New Features
Settings_FastNesting command.Settings_FastNesting (opens Settings), Clean_FastNesting (reset settings to defaults or remove FastNesting metadata from selected objects).System Requirements
- • Windows: Rhinoceros 7 or 8
- • macOS: Rhinoceros 8
- • 4GB RAM minimum
- • Internet connection for license activation
License Types
All PRO Features
- Unlimited pieces
- Report regeneration mode
- Smart labeling system
- Edge banding & Excel/PDF export
7 days or 10 Rhino sessions (whichever comes first)
Basic Features
- Up to 16 pieces
- Basic nesting & Rhino reports
- No report regeneration
- No edge banding or PDF/Excel export
After trial expires
All Features Included
- Unlimited pieces (up to 8,000)
- Report regeneration mode
- Smart labeling system
- Edge banding & Excel/PDF export
Installation
FastNesting can be downloaded from Food4Rhino, our official Rhinoceros 3D plugin marketplace, from here, or installed directly within Rhino using the Package Manager.
To install via Package Manager
- Ensure you have Rhinoceros 7 (Windows) or Rhinoceros 8 (Windows or Mac). FastNesting is available in the Package Manager on Rhino 7 (Windows) and Rhino 8 (Windows/Mac).
- Open Rhino.
- In the command line, type
PackageManagerand press Enter. - In the search bar, type FastNesting.
- Click Install and restart Rhino if prompted.
FastNesting will start in trial mode until the trial period expires, after which it will switch to the Free version or can be activated as the Pro version.
To install from a download
If you prefer to install from a direct download instead of Package Manager, get the file from our website or Food4Rhino:
- Rhino 8 (Windows/Mac): Download the
.yakfile. Uninstall any previous version from Package Manager first, then open Rhino and drag the .yak file onto the Rhino viewport. Restart Rhino if prompted. On Mac, FastNesting runs on Rhino 8 only. - Rhino 7 (Windows only): You can install via Package Manager (see above) or download the
.rhifile: close Rhino completely, then double-click the .rhi file to run the installer. Reopen Rhino when done.
How to update
Recommended (Mac and Windows): Use Rhino's Package Manager. In Rhino, run the PackageManager command, uninstall the previous FastNesting version, then install the new one. Your license is not affected and should register automatically. Restart Rhino after the update so the new version loads correctly.
Manual installation
- Rhino 8 (Mac and Windows): Use the
.yakpackage. Download it from our website or Food4Rhino. Uninstall the previous version from Package Manager first, then open Rhino and drag the .yak file onto the Rhino window to install. On Mac, FastNesting runs on Rhino 8 only. - Rhino 7 (Windows only): Use Package Manager (uninstall the old version, then install the new one) or the
.rhiinstaller: download it, then double-click to run the installer.
If you see problems or suspect corrupted files from an older install, remove the plugin folder before reinstalling: in Rhino go to File → Properties (or Rhino → Preferences on Mac), open Plug-ins, find FastNesting in the list, right-click it and choose Open containing folder. Delete only the contents of the FastNesting folder (do not delete files outside that folder), then install again using Package Manager or the manual method above. For Rhino 7 with .rhi, if the installer does not behave correctly, use this same folder cleanup and then reinstall.
In all cases: Restart Rhino after uninstalling and again after installing so that changes take effect.
Keeping your license and settings when updating
In most cases your PRO license and settings are preserved when you update: after installing the new version, open Rhino and your license should still be active.
If you have licensing problems after updating
If after updating you see license errors, "invalid license", or the plugin does not recognize your PRO license, do the following to reset and re-activate on this computer:
- In Rhino, run
License_FastNesting. - Click Deactivate License. This releases this computer from your license, so you can activate on another computer or re-activate here after reinstalling.
- If you installed via Package Manager: open Rhino, go to Tools > Package Manager, search for FastNesting, click Uninstall, then close Rhino. Otherwise, close Rhino.
- Install the new version of FastNesting (see How to update above).
- Open Rhino, run
License_FastNesting, and activate again with your same email and license key.
This process is the same on Windows and Mac. Your license key is not lost; you are only deactivating this machine so you can activate again cleanly.
User Guide
Command Reference
FastNesting
Main command to start the nesting process. Select your pieces first, then run this command. Panel parameters and units from Settings apply by default. You can also select existing nesting layouts to regenerate reports without re-running the algorithm.
License_FastNesting
Activate your PRO license or view your current license status. If you already have PRO, the dialog shows your license info and a Deactivate License button. Deactivating releases this computer from your license, so you can activate on another machine or re-activate on this one after reinstalling the plugin—useful if you have licensing problems after an update.
Settings_FastNesting
Opens the Settings dialog: report units, default panel parameters (with Edit to open Panel Parameters), fraction precision, labels, density unit, etc. Panel per material is set from the piece list dialog.
Clean_FastNesting
With no selection (press Enter at the prompt): Asks whether to reset FastNesting settings to defaults. If you choose Yes, all plugin settings are restored to their default values. Restart Rhino afterward so that dialogs show the updated values.
With objects selected: Removes FastNesting metadata from the selected objects. Choose an option:
- PreserveNames — Removes FastNesting metadata but keeps the piece name (
FN_Name) and Rhino object name. - ClearNames — Same as above and also clears the piece name and Rhino object name.
The command only deletes user data (e.g. FN_*, Rotar_Pieza, Skip); it does not change the geometry.
Understanding Dialogs
Settings

In this version, panel parameters and units are centralized in Settings. Open it from the main FastNesting dialog or by running Settings_FastNesting. Here you set report units (mm, cm, or in), default panel parameters (with an Edit button that opens Panel Parameters), fraction precision for inches, labels (e.g. part labels font size), and density unit (PRO). Panel per material is configured from the piece list dialog.
System Units / Report Units
Report units (millimeters, centimeters, or inches) are set in Settings. This is the standard for all outputs. On first run you may see a units step; afterward, change it anytime via Settings.
Important: Ideally, set the Rhino document to "Small Objects".
Panel Parameters Dialog
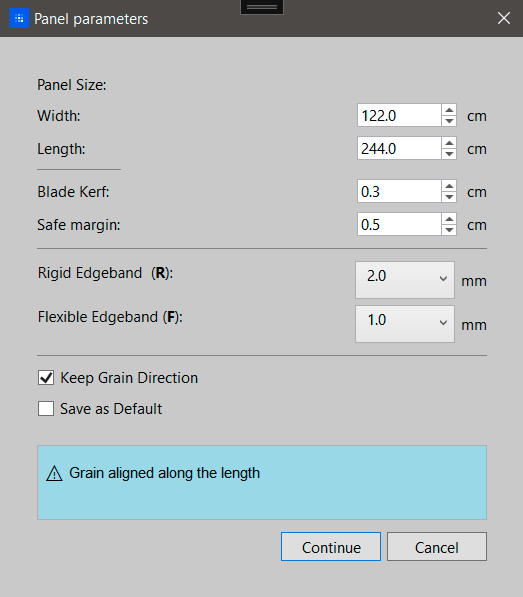
- Panel Size: Set sheet length and width — thickness is detected automatically from your Rhino model.
-
Blade Kerf: The customizable width of your cutting tool. Common values:
- 0.3 cm (3mm) Standard for most CNC router bits and thin kerf saw blades.
- 1/8" for imperial measurements: Common for full kerf saw blades.
- Safe Margin: The customizable edge margin to avoid damage. Typical: 0.5cm (5mm) or 1/4"
- Roughing margin (PRO): Optional cutting margin per piece; configurable here and in Settings.
-
Edge Banding Thickness: Select from the most common thicknesses for your edge material.
If you plan to use edge banding, you should verify or adjust these values for the desired type R or F.
Default values:- Rigid (R): For thick edge banding (2mm) | (5/64 in)
- Flexible (F): For thin edge banding (1mm) | (3/64 in)
Visual representation of edge banding applied to nesting layouts.
- Keep Grain Direction: Enable when working with wood veneer to maintain grain alignment along the length.
- Veneer match by Group (PRO): When enabled, the nesting algorithm prioritizes keeping parts from the same assembly close together.
- Estimated weight in reports (PRO): When enabled, reports can include an estimated weight for the nested (cut) pieces. Use the density preset dropdown to choose a material type (e.g. MDF, Melamine, Plywood, Wood, Glass, Steel, Iron) or Custom to enter a density value in kg/m³ or lb/ft³ (depending on the unit set in Settings). The preset values match typical densities for each material so you get a reasonable weight estimate in the report.
- Save as default: Save your personal settings (panel size, kerf, margins, density, etc.) as the default for future sessions. These defaults are used when a material does not have its own panel parameters.
Per material vs default: Each material (Rhino layer) can use its own panel parameters or the default values. Defaults are defined in Settings (click Edit next to "Default panel parameters" to open Panel Parameters) and can be overwritten with "Save as default" in the Panel Parameters dialog. To set or change parameters for a specific material, use the piece list dialog: open Panel per material and use Edit or Default for that material — Edit assigns custom panel size and options for that material; Default makes it use the global defaults again.
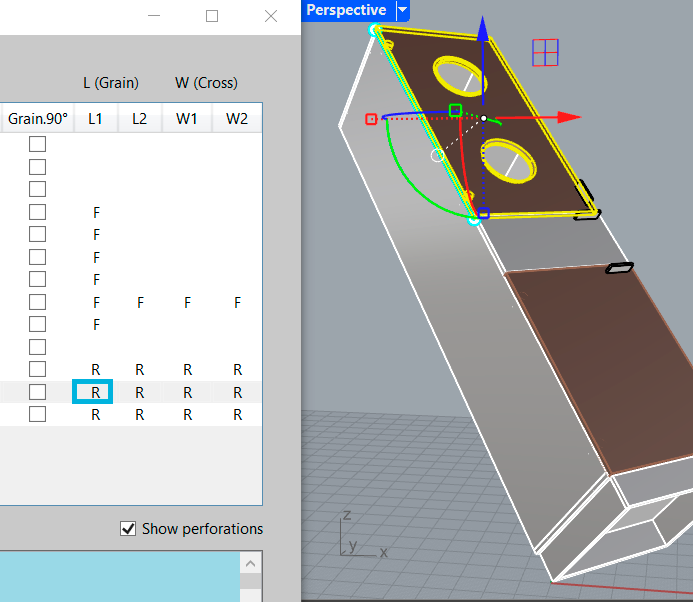
Parts Configurator Dialog
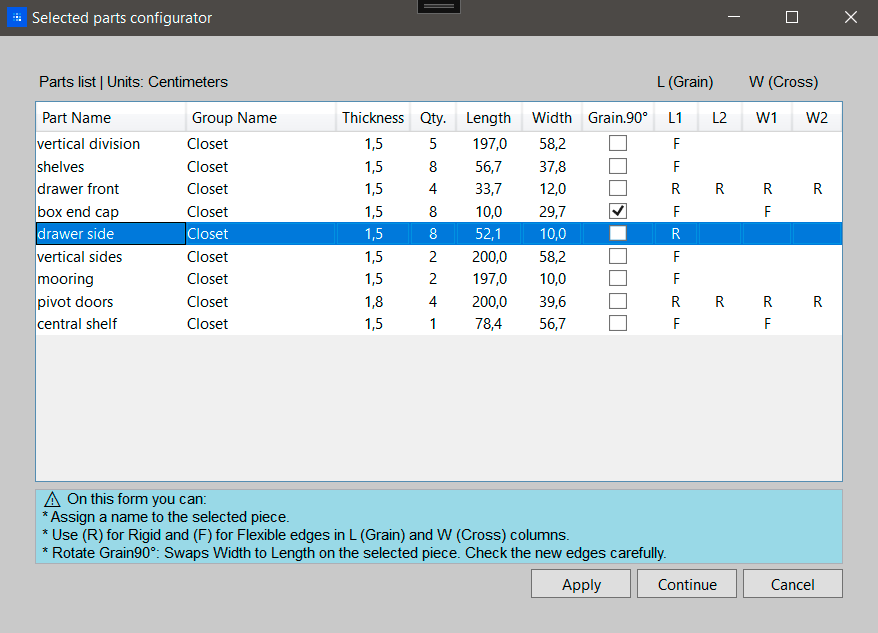
This table shows all selected pieces with their dimensions and allows you to:
- Part Name: Click to edit and give meaningful names (e.g., "Door", "Shelf", "Side Panel")
- Group Name: To see the names of the grouped parts here, you must name your part groups in Rhino before using the plugin. First, group them (command: Group) and then name them (command: SetGroupName). Examples of group names: "Closet", "Drawer", "Pantry".
-
L (Grain) & W (Cross) Columns: Set the edge banding by typing R or F:
- R = Rigid edge banding on that edge
- F = Flexible edge banding on that edge
- Empty = No edge banding
- L1, L2 = Left and Right edges along grain
- W1, W2 = Top and Bottom edges across grain
- Grain 90°: Check to rotate the grain direction for that piece
- Panel per material (PRO): From this dialog you can set or edit panel dimensions per material (Edit/Default) so nesting uses the right sheet size for each one.
Important: Exclude parts from processing by prefixing their name with a ! (e.g., !handles). Rename the part in the Rhino modeling space for permanent exclusion, or use the ! prefix in the Part Configurator for temporary exclusion on that execution only.
Apply or Continue saves your entries to each Rhino piece. You can adjust, cancel, and resume later without issues.
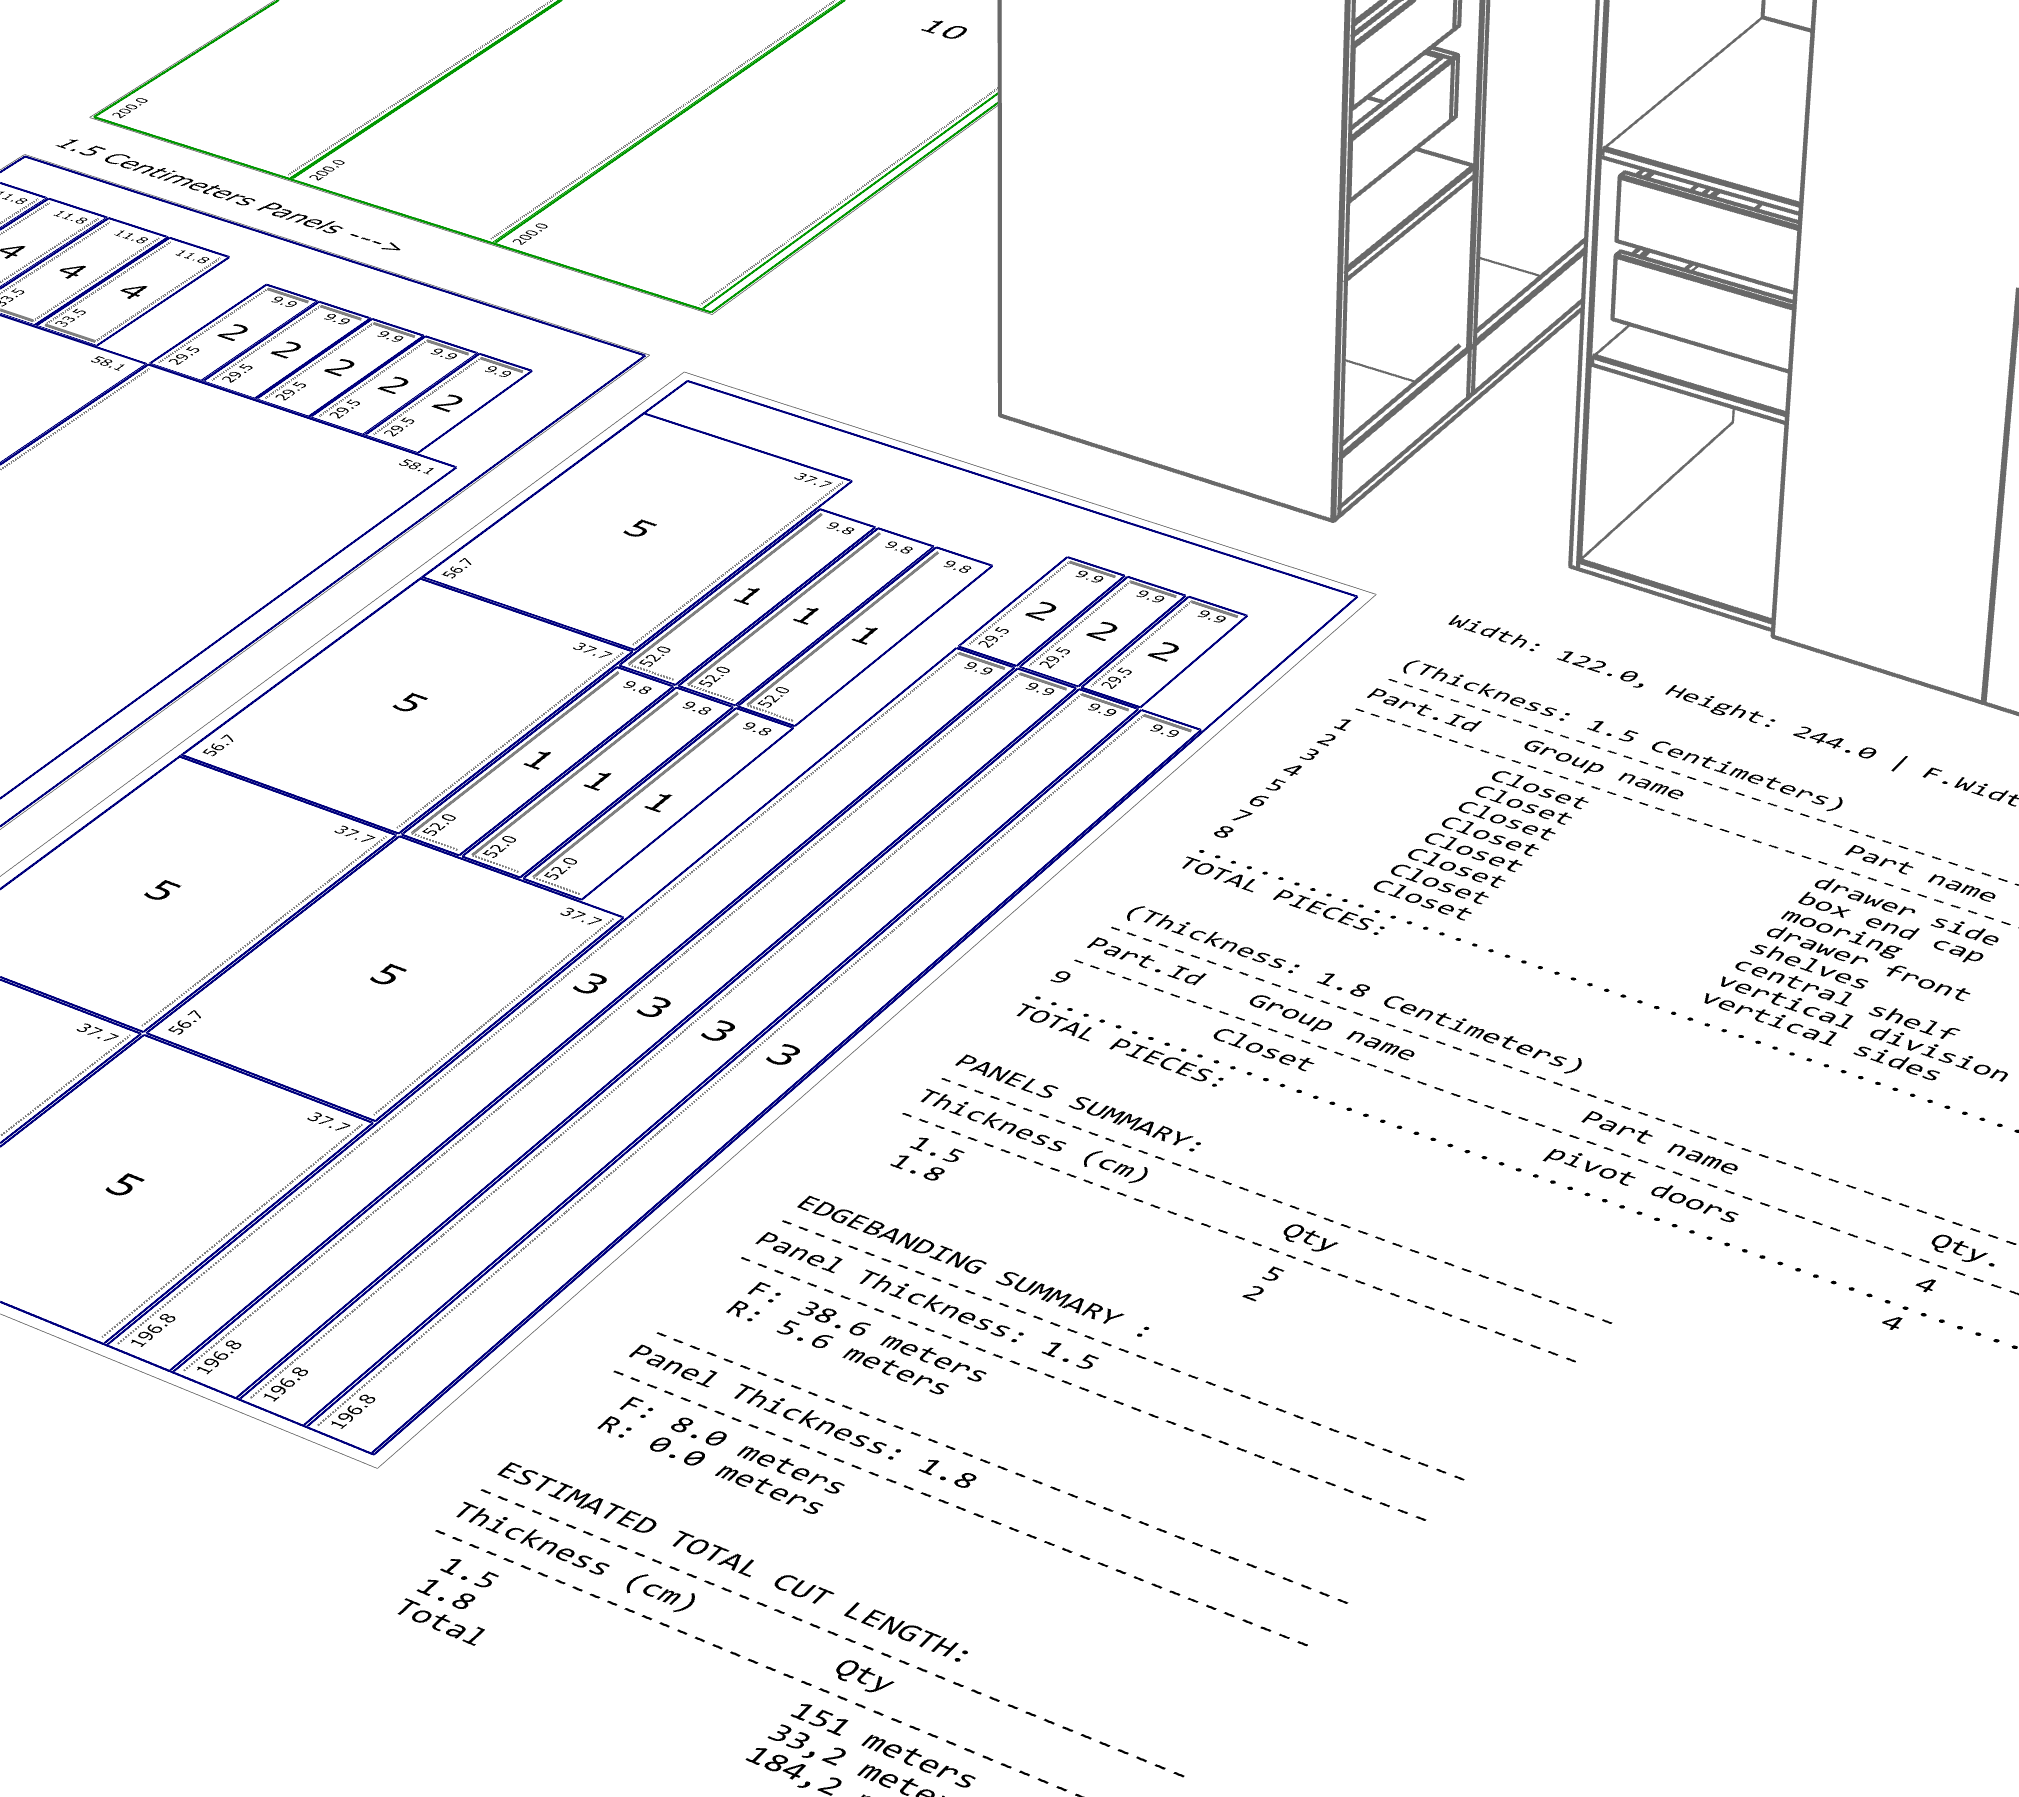
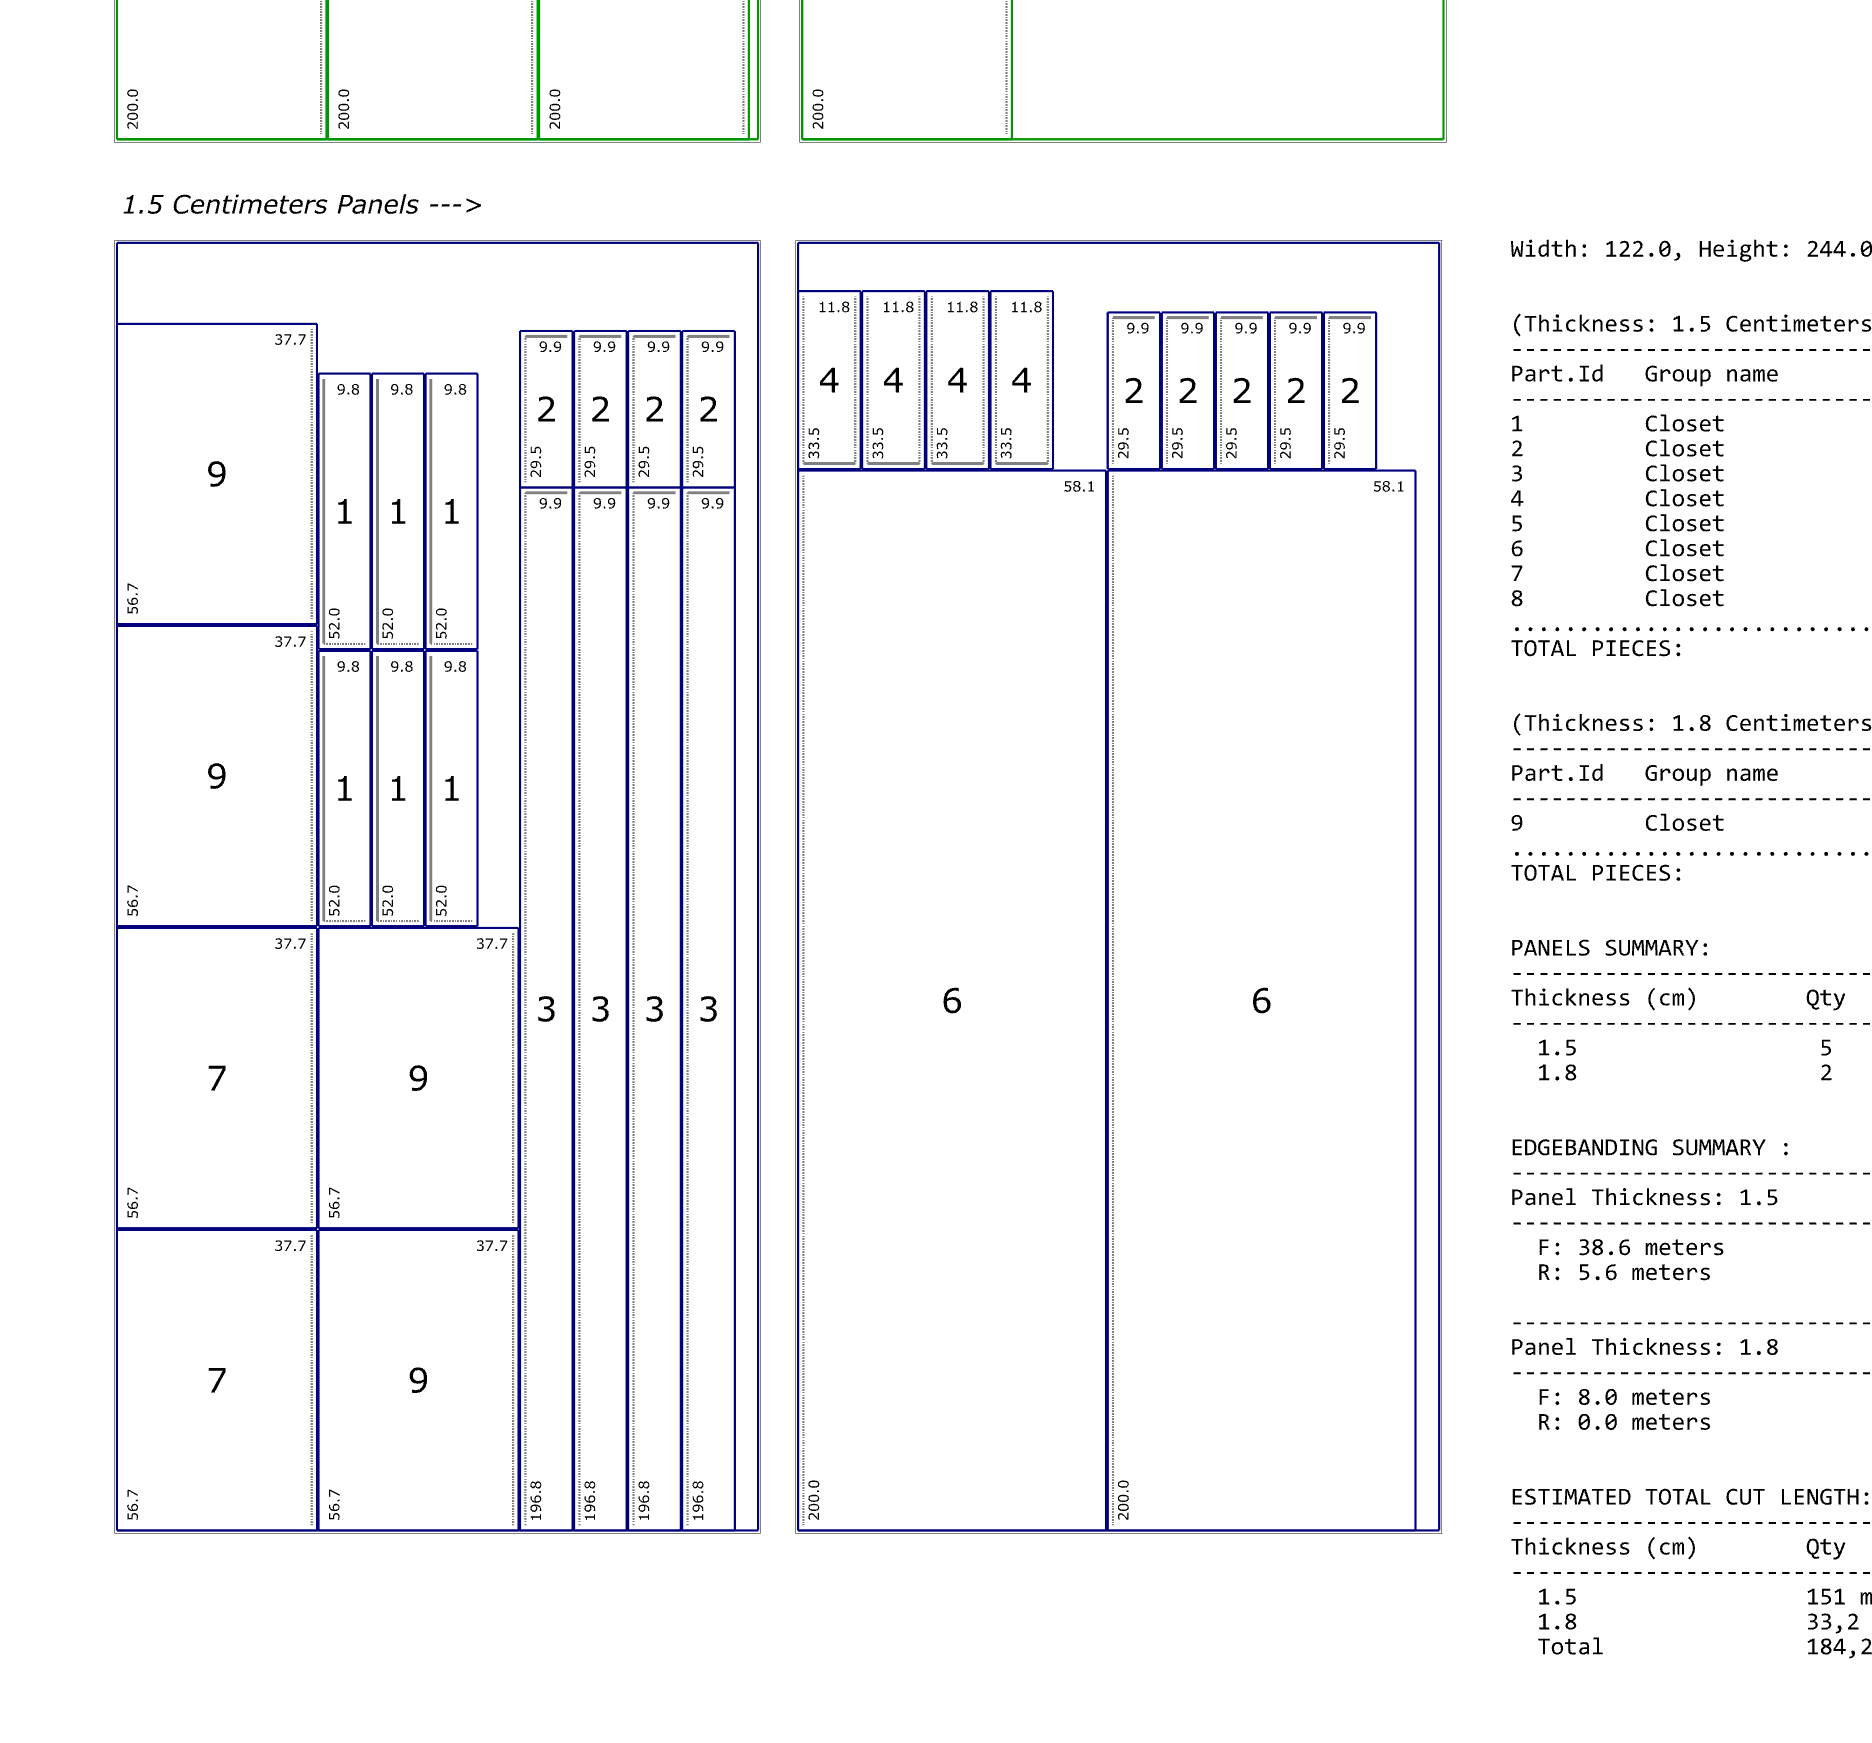
Understanding the nesting layout in Rhino
After running FastNesting, the result is drawn in your Rhino document. This section explains how to read the layout: line types, layers, dimensions (including when roughing is used), and what you get when exporting to Excel or PDF.
Line types on the nesting drawing (edgebanding)
The layout uses two line styles for edgebanding on the pieces:
- Continuous (solid) lines indicate R (rigid) edgebanding: the edge is to be banded with rigid/thick banding on that side.
- Dashed (non-continuous) lines indicate F (flexible) edgebanding: the edge is to be banded with flexible/thin banding on that side.
These lines are drawn offset inward from the piece outline and show which side of each edge is to be edge-banded, so you can read the layout at a glance.
Layers created by FastNesting
FastNesting organizes the nesting result into layers so you can show, hide, or export parts of the layout independently. Typical layers include:
- Layers for each panel (or sheet), so you can work with one panel at a time.
- Layers for piece outlines, cut lines, and labels, so you can toggle dimensions, text, or geometry as needed.
Layer names and structure may depend on your settings; check the layer list in Rhino after nesting to see the exact names and use them for plotting or export.
Double dimensions when roughing is applied
When a roughing margin is set (PRO), each piece has an outer rough contour and an inner finish contour. The layout and reports can show two dimensions for the same edge:
- Rough (outer) dimension: the size to cut first, including the roughing allowance.
- Finish (inner) dimension: the final size after trimming or machining.
Both may appear on the Rhino drawing and in the PDF so the workshop knows which dimension is for the rough cut and which for the finish cut.
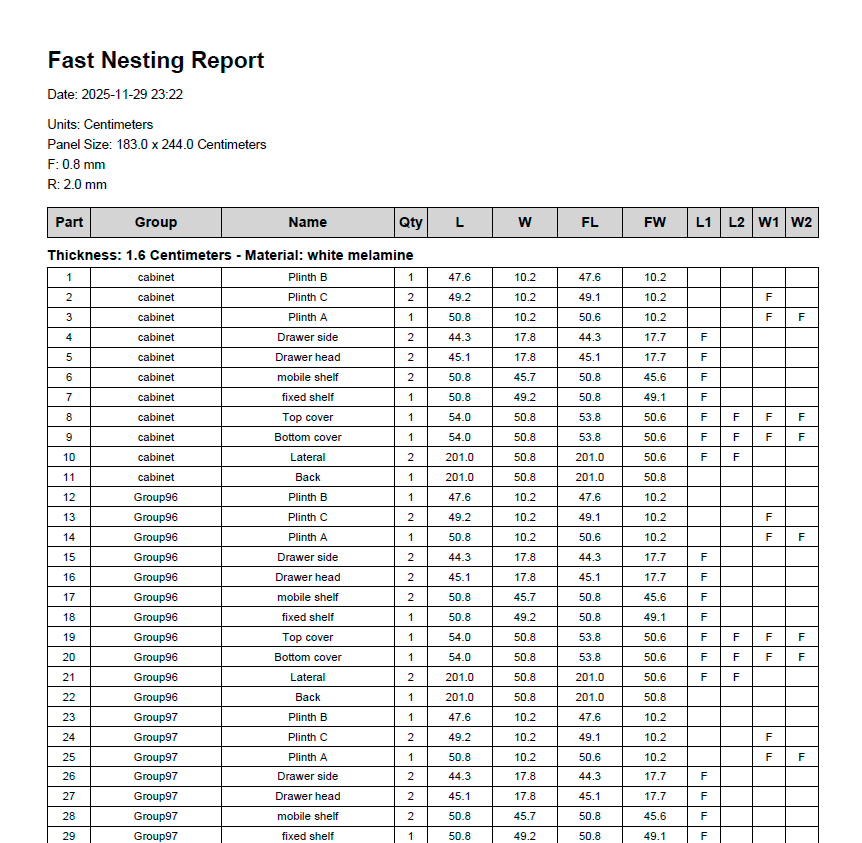
What you get when exporting to Excel
The Excel export gives you structured data for production and ordering:
- Cut lists by material: each piece with name, dimensions, quantity, and optional group or panel reference.
- Material summaries: sheet count, total area or linear cut length, and similar totals per material or panel type.
- Label / sticker data: one or more sheets with the information needed to print labels (e.g. piece number, name, dimensions) for the workshop.
- Accurate cut calculations: dimensions and quantities derived from the nesting so you can order material and plan cuts from the spreadsheet.
Available in the PRO version. Use it for ordering, cutting lists, and label printing without opening Rhino.
What you get when exporting to PDF
The PDF export gives you a printable, visual report of the nesting:
- Layout view: one or more pages showing the nesting layout at a consistent scale, with cut lines, piece outlines, and (if enabled) the cut ruler at the bottom of panels.
- Piece labels: numbers, names, or full information on each piece according to your labeling mode.
- Dimensions: key dimensions on the layout; when roughing is used, both rough and finish dimensions may be shown as described above.
- Statistics and cut list: summary data (number of pieces, panels, material used) and a cut list so the PDF is self-contained for the shop floor.
Available in the PRO version. Ideal for handing off to the workshop or archiving a specific nesting result.
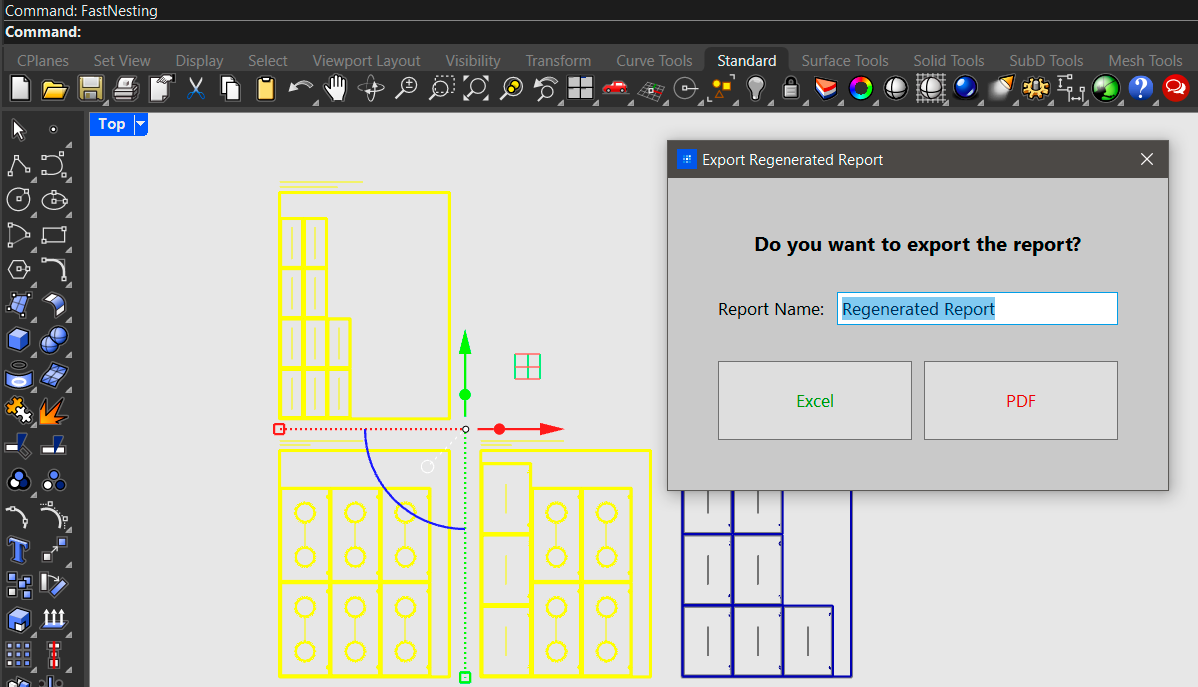
Report Regeneration Mode
Regeneration mode lets you re-export a report (PDF or Excel) from an existing nesting already drawn in Rhino, using the current positions of the pieces. The nesting algorithm is not run again and nothing is redrawn in Rhino; only the current layout is read and exported.
How to use:
- Have an existing nesting in the document (created earlier by FastNesting).
- For each panel you want in the report: select the panel rectangle and at least one piece on that panel. Only panels with both selected are included; only the pieces you select appear in the report.
- Run the
FastNestingcommand. - When the "Export Regenerated Report" dialog appears, choose PDF or Excel and save.
What you can do
- Move pieces within the same panel; the report uses their current position.
- Move a piece to another panel (same material and thickness) by placing it inside that panel’s rectangle.
- Rotate pieces 90°; the report detects it and shows dimensions and edgeband correctly.
- Include roughing and perforations; they are read from metadata and drawn in the PDF.
- Select extra geometry (labels, lines); only piece and panel curves are processed.
What you cannot do
- Rotate the panel outline (the sheet boundary rectangle). Only the sheet rectangle must stay in its original orientation; rotating pieces 0° or 90° is allowed. Rotating the panel outline disables regeneration and uses normal mode.
- Use rotations other than 0° or 90°; those pieces are excluded from the report.
- Scale or deform pieces; the report would be invalid.
- Assign a piece to a panel of a different thickness.
- Add new pieces that have no FastNesting metadata (only existing nesting curves are used).
- Redraw the layout in Rhino; only PDF/Excel export is available in this mode.
Good practices
- For each panel to include, select its rectangle and the pieces you want (at least one).
- When moving pieces between panels, keep them inside the destination panel’s rectangle.
- Only rotate pieces 0° or 90° if they should appear in the report.
- Do not rotate the panel outline (the sheet boundary rectangle); keep it in its original orientation. You may rotate pieces 0° or 90° as needed.
- Use regeneration only on nestings created by FastNesting (curves must have the plugin’s metadata).
Avoid
- Mixing pieces from different nestings in one selection; only one nesting ID is used, others are ignored.
- Moving only the panel rectangle without the pieces; assignment in the report may not match what you see.
- Selecting 3D geometry (Breps, etc.) if you want regeneration; that forces normal mode.
- Editing FastNesting User Data (FN_*) by hand in Rhino; it can make the report wrong.
Smart Labeling System
FastNesting offers three intelligent labeling modes to suit different production workflows:
Numbers Only
Clean, minimal labels showing only piece numbers for efficient CNC operations.
Names Only
Descriptive labels showing only piece names for easy identification during assembly.
All Information
Complete labels including numbers, names, groups, and dimensions for comprehensive documentation.
Improvements in this version
- Clearer UI and organization in Settings and Panel Parameters (e.g. density unit, report options).
- Better organization and readability of exported reports.
- Improved nesting algorithm with the option Veneer match by Group (in Settings and Panel Parameters): when enabled, the algorithm prioritizes keeping parts from the same assembly close together.
Export Options
Export to Rhino Document
- Draws directly in active document
- Organized layers by function
- Smart labeling with three modes
Export your nesting results directly to your Rhino document. Perfect for CNC preparation and visual verification.
Available in: Free and PRO versions
PDF Export
- Visual layout with accurate scaling
- Detailed statistics and cut lists
- Piece labels with full information
Generate professional PDF reports with visual layouts, detailed statistics, and comprehensive piece information.
Available in: PRO version only
Excel Export
- Detailed cutting lists by material
- Separate sheets for reports and labels
- Accurate cut calculations
Export comprehensive Excel spreadsheets with detailed cutting lists, material summaries, and sticker labels for production.
Available in: PRO version only
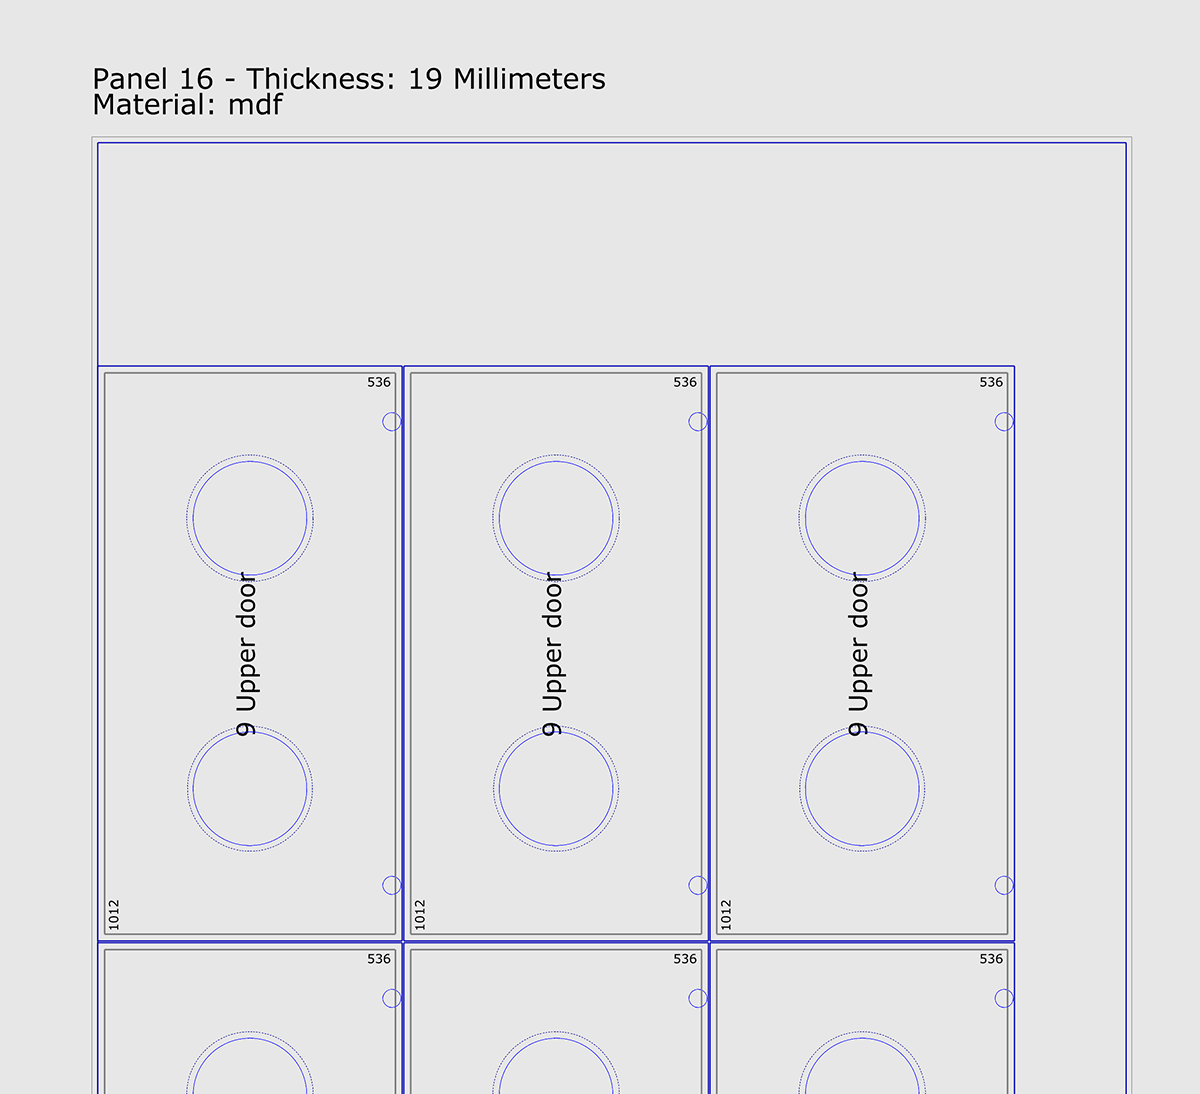
FastNesting supports nesting with internal holes and perforations.
Best Practices
1. Name Your Pieces During Modeling
It's a good idea to name your parts when modeling in Rhino (Right panel - Properties:Object / name). Use descriptive names like "Doors," "Left_Door," "Top_Shelf," "Rear_Panel." However, you can also name each part in the Part Configurator. Remember, if you don't want a part to be considered for the process, you can name it by placing a ! before the name, for example, !handles.
2. Group and Set Group Name: Pieces by Project
Group parts by project for clear organization across sheets. Each project can include multiple sheet thicknesses, all tracked in the final report. Best Practice: Before grouping and setting the group name, it is highly recommended to select all the parts (even those already grouped) and use the Rhino command Ungroup. After confirming all parts are individual, group them again (command: Group) and apply the desired project name (command: SetGroupName). This ensures clean data and prevents errors from previous, nested groups.
3. Double-Check Your Units
Verify that the units in the System Units dialog match your Rhino model units. Mixing centimeters and inches can easily lead to confusion or incorrect scaling.
4. Set Accurate Blade Kerf
Use the real cutting width of your tool (saw or CNC). Make a test cut to determine the exact kerf, or use a slightly higher value as a tolerance.
5. Be Careful with Grain Direction
When using "Keep Grain Direction" and rotating individual pieces (Grain 90°):
- The L (Grain) and W (Cross) columns could swap
- Verify your edge banding is still correct after rotation
- Check the visual result in Rhino before exporting or printing
6. Distinguish Pieces with Unique Names
If you have multiple pieces of the same size but different edge banding, give them unique names. Otherwise, they'll be grouped together and you won't be able to distinguish them in the report.
7. Save Settings as Default
In the Panel Parameters dialog, check "Save as Default" to reuse your common settings (sheet size, kerf, margins) in future sessions.
Troubleshooting
Command "FastNesting" not found
Possible causes:
- Plugin not installed correctly
- Rhino version incompatibility (need Rhino 7 or 8)
Solutions:
- Type
PackageManagerand verify FastNesting is listed - Try reinstalling by dragging the .yak file onto Rhino
- Check Rhino version: Rhino 6 is not yet supported
License activation fails
Solutions:
- Verify you're using the same email address you used for purchase
- Copy-paste the license key to avoid typos
- Check that you have internet connection (required for activation)
- Make sure license key format is correct: XXXX-XXXX-XXXXX-XXXXXXXX
- Contact support@camonsoft.com if issue persists
Pieces don't fit on panels
What happens:
If some pieces are too large for your panel size, they won't be included in the layout. You'll see a message in the report indicating which pieces couldn't be placed.
Solutions:
- Use larger panel sizes
- Split large pieces into smaller sections in your model
- Check blade kerf and margins aren't too large
- Verify your units are correct (cm vs inches)
Measurement inconsistencies
Most common cause:
Wrong unit selection. If your Rhino model is in centimeters but you select inches in the System Units dialog, all measurements will be wrong.
Solutions:
- Check your Rhino document units: Type
Units - Select matching units in FastNesting System Units dialog
- If measurements are exactly 2.54x off, you mixed cm and inches
Edge banding errors after rotating grain
What happens:
When you rotate a piece's grain direction (Grain 90°), the L (Grain) and W (Cross) edges swap. If you don't update the edge banding settings, the wrong edges will be banded.
Solution:
- After checking "Grain 90°", review the edge banding in L and W columns
- Swap R/F values if needed to match the new orientation
- Check the visual result in Rhino before exporting
Purchase & invoice (business details & VAT)
Payments are processed securely by Paddle (our merchant of record). If you need your company name, VAT / tax ID, and billing address on the tax invoice, you can add them during checkout.
Where to enter business details
- On our checkout page, choose your product and enter your email and name, then click to open the secure payment window.
- Enter your email and country on the first step, then click Continue.
- On the payment step (card or PayPal / Google Pay), look at the order summary on the left. Below the VAT line you will see a link: Add VAT number.
- Click Add VAT number. A form opens where you can enter your VAT number, company name, street address, city, state/county, and postcode (fields may vary slightly by country).
- Complete the payment. Those details are included on your Paddle tax invoice.
The Add VAT number option appears on the payment step (after Continue), not on the first screen—look for it in the left-hand order summary next to the payment form.
If you need help after purchase, contact support@camonsoft.com.
Frequently Asked Questions
How does the trial period work?
FastNesting starts in PRO trial mode from the moment you install it. The trial lasts for 7 days or 10 Rhino sessions (whichever comes first). A "session" (or "use") means each time you open Rhino; running the FastNesting command multiple times in the same Rhino session does not use up the counter. So you get up to 10 times opening Rhino with full PRO, or 7 calendar days.
What happens after the trial expires?
After the trial ends, FastNesting switches to the Free version. In Free you can:
- Run nesting with up to 16 pieces per nesting
- View and use the nesting layout in Rhino
- Use the plugin to measure and work with pieces
Free does not include: edge banding (R/F) calculation, PDF or Excel export, Report Regeneration mode, panel parameters per material, roughing margin, estimated weight in reports, or other PRO-only features. You can upgrade to PRO at any time from the license dialog or from our website to unlock all features.
Can I use my license on multiple computers?
It depends on which license you bought. FastNesting is available in two options: One Seat (one computer: install and activate on a single personal computer—desktop, laptop, or workstation) and Three Seats (up to three computers—giving you seamless access across your everyday devices). Check your purchase confirmation or the license dialog in the plugin to see how many activations your license allows.
Do I need internet to use FastNesting?
Internet is only required for initial license activation. After activation, FastNesting works completely offline.
Is the PRO license lifetime?
Yes! Your PRO license is lifetime for that version of FastNesting. You'll receive free updates to that version. If a major new version is released in the future, you can continue using your current version or purchase an upgrade license for the new version.
Can I get a refund?
You have the 7-day (or 10-session) PRO trial to fully test FastNesting before buying, so you can try all features and know exactly what you're getting. We don't normally process refunds because of that. If you still need to reverse your purchase, our payment processor allows chargebacks or refund requests within 1 to 2 weeks after the purchase; contact us or use the option provided by the processor within that period.
Which Rhino versions are supported?
FastNesting works with Rhinoceros 7 and 8 on Windows. On Mac, only Rhinoceros 8 is supported.
How do I reset all settings?
Run Clean_FastNesting, press Enter without selecting any objects, then choose Yes to restore all FastNesting settings to their default values. Restart Rhino afterward so that dialogs show the updated values.
Where is FastNesting available?
You can get FastNesting in three ways: from Food4Rhino (the official Rhinoceros 3D plugin marketplace), from our website, or directly inside Rhino via the Package Manager (PackageManager command, then search for FastNesting). All three options provide the same plugin; choose the one that suits you best.
How many pieces can I nest in PRO version?
The PRO version allows up to 8,000 pieces. This limit was set to guarantee stable performance and accurate label exports in Excel.
Can I use FastNesting for commercial projects?
Absolutely! FastNesting PRO license includes commercial use rights. Use it for client projects, production work, and commercial manufacturing.
Does FastNesting have a toolbar?
No. FastNesting is command-based. Simply type FastNesting to start. This keeps your Rhino interface clean and works consistently across all Rhino versions.
What export formats are supported?
FastNesting can export to Rhino Document (all versions) for visual reports, PDF (PRO only) for professional layouts with statistics, and Excel (PRO only) for detailed cutting lists with accurate calculations.
What are the main improvements?
FastNesting includes several major improvements:
- Report Regeneration Mode: Create PDF or Excel reports from existing nesting layouts in Rhino without re-running the nesting algorithm.
- Smart Labeling: Three labeling modes (Numbers, Names, or All Information) for different production needs.
- Enhanced Compatibility: Improved performance and interface optimization for both Windows and macOS.
- Improved Accuracy: Better cut calculations and edge banding (R/F) handling.
Can I suggest new features?
Yes! We love hearing from our users. Send your feature requests to support@camonsoft.com and we'll consider them for future updates.
Need More Help?
Can't find what you're looking for? Our support team is here to help you get the most out of FastNesting.